Showing posts with label natural beauty. Show all posts

Moisturizing Oat Face Mask


I've sure been using oats a lot lately in my beauty concoctions, haven't I?  The Lemon Ginger Fancy Bath and Honey Oat Lotion were both pampering recipes that featured oats. Oats are a grain that is as much a staple in my beauty routine as in my diet (Don't forget, the yummy Double Berry Smoothie also had oats!), and for good reason. I've said it before, but I'll say it again — oats are so so so good for the skin. You'll see it often as an ingredient in lotions, especially those made specifically for sensitive skin. Oats are equal parts soothing and moisturizing.

This is a mask I use often when I feel my face just needs a really big refresh; like if my skin is getting really dry and flaky, if my complexion has been looking a little dull, or if I'm having some hormonal breakouts. I usually put it on and soak in a bath while it sits, wash it off in a quick shower, and then finish it all off with an exfoliating scrub of coconut oil and baking soda (<-- Hey that's one of my first posts! Crazy.). The best part is this isa really simple recipe, full of simple ingredients that are fantastic for the skin; oats, egg white, honey, and green tea. See more details and the full recipe below.


MOISTURIZING OAT FACE MASK | yield: 2-3 masks

Ingredients                                                

+ 1/4 cup of oats
+ 1 egg white
+ 1 tablespoon honey
+ 1 to 2 ounces green tea

Directions                                                 

Bowl some water and make a cup of green tea — set aside to cool. Measure out the oats and, using a food processor or blender, blend into a fine powder. Place the processed oats into a small bowl and add in the egg white; use a fork to thoroughly mush the two together. Do the same with the honey. Once the tea is cooled, add in an ounce or two as well, until you achieve a constituency similar to pancake batter. You can add in more tea if it is not easily spreadable.

Apply to your face in a thin, but generous layer. Allow to sit for at least 20 minutes (up to 40 minutes). The mask will dry, and because of the addition of the egg white tighten a bit (after about 15 minutes). Wash off completely with warm water. Your skin should feel smooth, clean, and moisturized and your pores will likely look smaller! This recipe makes enough for three (two if you apply more liberally than me) masks. You can store the leftovers in an airtight container in your refrigerator for 7 days.

Oh, and now you've seen a picture of me with oatmeal on my face. I feel like that is some sort of milestone in our relationship? Maybe?

Enjoy!
xx Emorie

Lemon Ginger Fancy Bath

I'm not usually one to indulge in baths. I prefer to get in and out of the shower quickly 99% of the time. And I really rather dislike being too hot (ugh, summer), so soaking in a steaming tub does not normally appeal to me. But there are times when I do enjoy them — when I'm sick with fever, when I have really sore muscles, or when I've been stressed for days and desperately need a good a pampering to recuperate.

Because they are so rare for me, when I bathe, I tend to go all out. I consider them an indulgence, after all, and cooking up a nice soothing concoction to dip yourself in will make you feel all fancy as you sit naked, surrounded by various bottles, in your bathtub. I don't know, maybe you'll even kick it up a notch and transfer those shower products to the bathroom counter before you slip in to soak. Replace them with candles! Ambiance, babe. You deserve it.


LEMON GINGER SOOTHING BATH | yield: one bath

Ingredients                                                                         

1/2 cup oats
1/2 cup baking soda
4 tablespoons coconut oil
2 lemon ginger tea bags
1 green tea bag
2 tablespoons ginger
1 lemon sliced (optional)

Supplies                                                                              

+ coffee filters
+ string/twine
+ wooden spoon
+ a bathtub, of course

Method                                                                               

Measure out the oats and scoop them into coffee filters — I used two, but you may be able to squeeze it into one if your filters are larger than mine. Tie the bags off tightly with twine. Start your bath, using the hottest water you can bare. I always turn the faucet heat up completely and just let it sit a few minutes before getting in. When you start the water, immediately place the oats and tea bags into the tub (so they have plenty of time to steep). Dump in the measured baking soda and ginger, under the faucet. Lastly, stir in the spoonfuls of coconut oil. Use a big wooden spoon to evenly distribute the oil throughout the bath. Once the tub is full, and it is to a temperate you can bare, slip in for a soak!


I'll soak in this particular bath anywhere from 20 to 40 minutes. The lemon ginger tea is what gives this bath it's scent, and it is a rather soothing, relaxing one. Green tea is great and healthy for the skin, and oats and coconut oil will leave your skin super soft, nourished, and moisturized. I like to end my bath by breaking open one of the coffee filter pouches full of oats. Having soaked in the hot bath, the oats will be an extra creamy paste. I like to massage this all over my skin right before draining the water, then rinse off quickly under a cool shower. If rubbing mushing oats on your body is off-putting, I'll forgive you if you skip this step :) but do know it is extra moisturizing and nourishing.

A word of caution: This bath will likely make you sweat. A lot. That would be thanks to the hot temperature and the addition of ginger. Ginger helps stimulate blood flow. But don't worry, it's really good for you; sweat those gross things out of your body! The ginger and baking soda act as a simple mini detox, leaving you feeling very fresh and calm. Just, please, be sure to drink plenty of water before, during, and after. If you start to feel sick (lightheaded and/or nauseous), simply sit up out of the water.

Enjoy your indulgence!
xx Emorie

Honey Oat Lotion


With all the hiking I've been doing in the chilly, winding dry air combined with all the moving and cleaning I've been up to, my hands have been unbelievably dy. Like, so severe that you could easily see a layer of dead skin on top, the skin was cracked, and my knuckles constantly bloody. That dry. Ouch and gross. So I've been in need of some quality, heavy duty lotion to fix this. Many of you already know that I am not a fan of buying store bought beauty products of any kind (so many chemicals! so expensive!), and that I really enjoy creating alternatives. But what you probably didn't know is that I am often terribly lazy about getting around to making something, especially when I really need it. So, I'd been using a tiny bottle of all natural lotion Will bought for me in the winter to keep in my purse (mostly for his benefit, because his hands were always dry when we were out and about in the winter) and pouting about it. Because who has the time to experiment making lotions? Well, lucky me (and you because hello recipe), I did recently. And I managed to find something that I really like that works wonderfully.

This is by far my favorite of all the beauty recipes I have shared here so far. I'm sure I probably say that every time I post a new recipe for you and, rightly so; there have been so many great ones so far. I especially love the great body scrubs I've posted: Warm Vanilla Sugar Body Scrub and Moisturizing Cinnamon Honey Salt Scrub, and I use both often. But this lotion is something I am already using everyday and I love that. I has a permanent place beside the hand soap on my kitchen counter. It is the perfect ending to a sink full of dishes and it's had made all the difference to the health of my hands. They are no longer cracked and dry from all the washing I give them (I'm a clean freak, sorry hands). It doesn't get much better than that.

The combination of ground oats and coconut oil in this recipe means that the lotion ends up feeling smooth and thick and frothy. It rubs into the skin shockingly well, without leaving an oily layer behind — like you might experience with using coconut oil alone. It is fast to make, with few ingredients that are all beneficial for the skin. Lightly scented, you can personalize this lotion easily to suit your tastes and preferences. See the full recipe below.


HONEY OAT LOTION | yields 14 FL OZ

For the Lotion                                            

1 cup oats
1 1/4 cup coconut oil (solid)
1 tablespoon honey
1/4 cup mint rosemary green tea, optional

Instructions                                                

1. Measure out 1 cup of oats and place in a food processor. Process until oats become a fine, smooth powder. It may be easier to achieve the desired consistency by dividing the oats in two and processing the oats in two separate batches.
2. Measure out the coconut oil and place in a mixing boil. It is important that the coconut oil be completely solid for this step. Using a hand mixer, beat the oil starting on the lowest setting — breaking up large clumps and creating a smooth consistency — then gradually increasing the speed of the mixer to high. Beat the coconut oil for 1 minute on high, until smooth and fluffy. It should look a bit like whipped cream.
3. Let the whipped oil sit while you make some tea. This step is optional, and you may choose to use essential oils instead or simply enjoy the scent of the honey and oats alone. Green tea has great antioxidant properties and is great for the skin, and the scent of green tea, mint, and rosemary together is lovely so I recommend it. I used a tea bag titled Moroccan Mint, by Stash Tea, which is a lovely green. Before brewing, I carefully opened the bag and stuffed a tablespoon of rosemary inside, then secured the bag closed again. Pour 1/4 cup boiling water over your tea bag and let steep until completely cooled.
4. Slowly combine the oat powder with the whipped oil. Begin on low speed with your hand mixer, and add the oats in in small batches — combining thoroughly each time before adding more. Once all oats have been added to the oil and blended in completely, again increase the speed on your mixer to high and beat for 1 minute. The combined result should closely resemble pancake batter.
5. Add a tablespoon of honey to the mixture and combine. Add in the tea as well. Just be sure that it is entirely cool before doing so (very important!), as you do not want to melt the oil and ruin your work. Place it in the freezer for a few minutes before adding, if needed.
6. Beat everything together one last time, for good measure.

Enjoy! Stay moisturized.

xx Emorie

Warm Vanilla Sugar Body Scrub


I've mentioned before that I've really enjoyed making all of my Christmas gifts in the past and so I was planning on doing that again this year. I've got a few posts lined up to share with you what I've been busy crafting. If you're on the look out for fun, easy, and unique DIY gifts, hopefully I can give you a few ideas. This scrub is definitely something that will show up in a few people's gifts. It can be packed up so pretty, smells heavenly, and works wonders on skin. I just have to share it with some of my favorite people!

Do you remember the cinnamon honey salt scrub I made a few months back? I've been pretty obsessed with homemade body scrubs since then. I mean, they are simple to create (usually with things you already have in your kitchen), smell great, work better than any body scrub I've ever purchased, and fairly cheap. I like this sugar scrub even better than the salt scrub I made. It's a bit gentler and lots sweeter. I love vanilla this time of year, it's a really warm cozy scent. A nice exfoliation with this scrub in a hot bath sounds like the perfect end to a cold winter day to me. 


Warm Vanilla Sugar Body Scrub

Ingredients:
3/4 cups raw cane sugar
1 cup sugar
1/2 cup brown sugar
3/4 cup coconut oil solid
1/3 cup almond or olive oil
2 tablespoons honey
2 to 3 teaspoons vanilla extract or a few drops essential oil 

Directions: 
+ Combine the raw cane sugar and the regular sugar in a large bowl and mash it together with room temperature (solid) coconut oil. This looks just like butter and sugar does creamed together. A fork works best here, to evenly distribute the coconut oil and leave no large lumps.
+ Add the honey, almond or olive oil, and vanilla stirring with a spatula until combined.
+ Finally, stir in the brown sugar. Add more vanilla, if desired, until you reach a scent you are satisfied with.

Storage and Usage: 
+ Store in little glass jars. These can be packaged up nicely for gifts; create a label for the lid of the jar and tie some pretty ribbon around.
+ If desired, top the scrub with a few sprinkles of brown sugar and/or coconut flakes before packaging.
+ To use the scrub, apply to dry or damp skin rubbing gently for a bit and rinse off.


Enjoy exfoliating and moisturizing!
xx Emorie


Braided Crown 3 Ways: The Bohemian Wrap


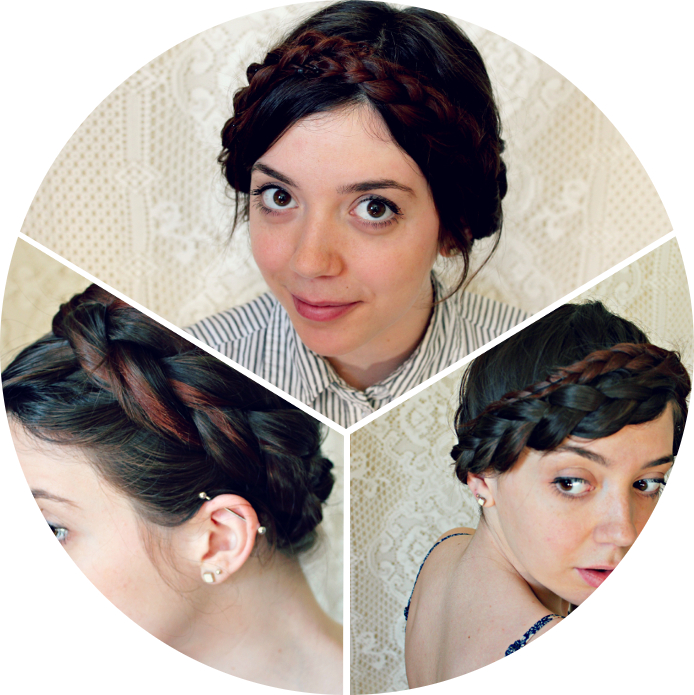
It is here at last, part 3 of my first ever hair tutorial, a Braided Crown 3 Ways. I am calling it The Bohemian
Wrap. This look sure has quite a bit more personality and funk than the other two crowns I have shown you, which is why I love it. I've been an avid wearer of a forehead braid for quite some time; for as long as my hair has been long enough to allow it, actually. Up until recently I had only been braiding a forehead braid to just past my ear and wearing it with my hair down. Or around the back and into a side ponytail. I thought, why not take it a step further? I love the spin a forehead braid puts on a braided crown, so I had to share.


This may be the most difficult of the braids I have shown you. It is tricky to get the end of your braid to lay right. And it may be tricky for you to braid your bangs. It will be more difficult if you have bangs that are shorter than to your ears, but you can definitely still try (be prepared to be tucking lots of ends in with bobby pins)!


1. Begin by combing through your hair to remove any tangles. Run a tiny bit of coconut oil through your hair with your finger tips, if you'd like. Doing so will help with frizz and create a nice smooth braid. Create a very deep side part and comb your hair flat over to the opposite side.
2. Select three strands of hair about an inch back along the side part and begin french braiding towards your forehead.
3. Once the braid has reached your forehead, continue to french braid but only gather new hair from one side. Gather from the side towards the back of your head, creating nice loops on your forehead.
4. Continue in the fashion all the way across your forehead, sloping downward towards the opposite ear.
5. Bring the braid over the top of the ear a bit, and continue it toward the bottom back of your head.
6. Once the braid has reached the back of your head, begin a normal french braid again, gather hair from both sides as you braid.
7. Braid all along the back and then slowly braid up again, towards your other ear, until you have all of your hair in the braid. If your hair is not long enough to braid all the way around, consider ending the braid near your first ear and wearing it with your hair down or bringing it to the opposite side into a side ponytail or starting another braid on the opposite side and meeting them in the back of your head (covering up the ends with a bow or clip if needed).
8. Finish the braid and bring it back over the top of your head, being careful that the hair around the ear lays flat when you do so.
9. Meet the end of the braid with the beginning of it as best you can and pin in place.

Be sure to also check out part 1 and 2:
The Criss-Cross Applesauce
The Upside Down and Around


P.s. I'm sad looking at this pictures because I lost one of those little white square earrings when I was camping and I am a baby.

Braided Crown 3 Ways: The Upside Down and Around


Here you have it, lovelies, part 2 of my first ever hair tutorial, a Braided Crown 3 Ways. I like calling this one The Upside Down and Around, because of the way you have to comb all your hair forward and hang upside down for a bit to achieve it. This is a more traditional way of achieving the gorgeous braided crown style than The Criss-Cross Applesauce and also a step or two up in difficulty. But don't let that discourage you, practice it a few times, and I'm sure you can get it down. At first I had difficulty getting the braid to lay right when I brought it around front to the top of my head and had to do it a few times every time to get it looking right. I can now get it in one go! Marvelous.


In my opinion, The Upside Down and Around is not quite as playful as The Criss-Cross Applesauce. Rather, I think the style of this one is super elegant and classy. But still the kind of classy you can pair with jeans and a t-shirt if you fancy. Try giving it a go!


1. Begin by combing any tangles out of your hair and then comb it all completely forward.
2. Select three strands of hair from the bottom center, near your neck.
3. Using these three strands, begin braiding a french braid in an inside out fashion. To do this, when you go to cross the strands of hair, bring the strand under the previous one instead of over, collecting more hair with each strand also. Braid upwards at an angle, sort of towards your ear. This is where I had trouble for the longest time. You do not want to braid straight upwards to the top of your head, rather bring it around the side a bit. Think of a halo or a crown sitting on your head and creating that roundness.
4. Once the braid has reached the top of your head, flip right side up again. Continue braiding in the inside out style, gathering the hair from the top of your head, including your bangs if you've got 'em (you can totally leave them out, if you want, don't let me tell you what to do).
5. Braid all the way across you head, eventually bringing the braid back down and back a bit. Gather any remaining hair from the nape of you neck, if any, and finish the braid.
6. Take the end of your braid and loop it around the back of your head following the pattern already there from the start of the braid. You will pin it back into itself.
7. Using a generous amount of bobby pins, secure the end of the braid in place, as well as flattening any bumps and tightening flyways. If your hair is not long enough for the end of your braid to reach all the way back around, you can secure the end into a bun, or hide the end of the braid with a cute lace bow.
8. Once pinned in place, loosen some of the loops of your braid up a bit, for a more romantic look.

There you have it. Have you worn your hair this way before?

Don't forget:
- you can see The Criss-Cross Applesauce here
- and The Bohemian Wrap is now here

Braided Crown 3 Ways: The Criss-Cross Applesauce


I am so excited to share my first hair tutorial with you guys! And because it is my first tutorial, I wanted to do something extra special. But also something that I actually do wear myself regularly. I of course immediately thought sharing a braided crown would be perfect. I soon also realized I wear a braided crown an assortment of ways. So, lucky you, I am actually doing three tutorials. That means it will be coming to you in three parts.

Braided crowns are a go-to of mine these days. I remember when the style was first becoming popular in my neck of the woods and wanting desperately to join in, but my hair was still a little to short at the time. But I kept trying; I'd put little bow were the braid ended or gather the end in a bun instead of wrapping it all the way around. When my hair was finally long enough to wrap my whole head braided, I may have jumped for joy a bit! And by that time I had plenty of practice and had the braided crown look down a number of ways. This has come in handy lately as the weather here has sure gotten unbearably hot fast and I have a whole lot of hair that I'm still not sure what to do with. I've probably mentioned it before, but this is the longest my hair has ever been (and I have to convince myself everyday to not take scissors to it). I am happy that it now seems to be long enough to allow me to do any kind of style I can think of (except cute, short ones of course). So I've been getting it off my neck and getting creative with it to.


This braided crown, which I love to call The Criss-Cross Applesauce, is most likely the easiest of the three braided crowns I will show you. As such, it is the one I wear the most. It takes a matter of minutes, two normal braids, and some bobby pins to pull it off. It is, in my opinion, a perfect combination of sophistication and casual. You are bound to get compliments on this hair-do. I'll leave it at your discretion as to whether or not you want to share how easy the look is to achieve :) Plus, you may be able to pull this off with shoulder-length hair, so long as you don't have a ton of layers.


1. Begin by combing any tangles out of your hair and then gathering your hair into two sections.
2. Apply a tiny bit of coconut oil with the tips of you fingers to each gather section. Braid one section and secure it with a small rubber-band (the closer to your hair color, the better). Do this to the other section as well. I like to hold my hair outward as I am braiding it, versus braiding downward,  allowing the base of the braid to be a little looser. This will help your braids sit better around your ears as you pull them up.
3. Take one of the braids and cross it over the top of your head. Adjust as needed, to get the braid to lay flat around the ear. Using bobby pins, pin the braid in place on the top of your head, paying extra attention to the end of the braid and making it lay flat. I like to imagine placing it where a headband would rest. Once pinned, loosen the braid up a bit carefully with your fingers to make it look more natural.
4. Do the same with the other braid. Cross it over the top of your head and the braid already pinned in place, tucking the end of it into to the other braid. Pin in place. Add as many bobby pins as needed for the braids to feel secure.
5. Tuck in any unwanted flyways and tuck your bangs back if preferred.

See, super simple. It just looks like you spent a lot of time on it. Plus, braided crowns are perfect for dirty, summer hair. And a HUGE thank you to my sister, Bee, for taking all the pictures for me. And for not thinking I was weird when I asked you to come over and take pictures of me doing my hair :)

Update:
- you can see The Upside Down and Around here
- and The Bohemian Wrap is here now too!

Summer Hair Inspiration

natural curls / beachy waves / cute short / casual up-do / forehead braid / messy
Summer to me screams natural hair. It is a time when everyone seems to embrace their own texture, color, and style. And I love this. One, because it is easy and realistic (given the summer heat) and two, because it is beautiful. This is the longest my hair has ever been and I'm struggling a bit as to what to do with it all. I still want to grow it out, but this time of year is when I always reach for the scissors and chop it off all over again. All this dark, thick hair is keeping me toasty; my sun hat has quickly become my saving grace. The fact that messy hair, or that beachy look, is desired this time of year is perfect because most days I don't have the patience to do anything with it. I'd sure love to experiment with new braids and up-dos, to get it all off my neck, but it is great to be carefree about my hair as well. Just air dry and go.

Summer is a perfect time to wash your hair less. Way less. You may remember me mentioning that I don't use shampoo on my hair. Well I wash it even less in the summer. Put it up, braid it, tie a scarf around, or put a hat on if you have to! Give your hair a bit of a break from all the damage it has been collecting the rest of the year from styling and give it regular deep conditioning treatments to protect it from the sun. I would recommend investing in some coconut oil.

Embrace those natural locks, lovelies.
  

Moisturizing Cinnamon Honey Salt Scrub


My skin has a tendency to really dry out often. It's due to the dry air here, I think. Exfoliating scrubs and intense moisturizing are a regular must of mine, lest I want my skin looking dull. But you know, what? Beauty products are a little (or a lot) too expensive for my liking. And 9 times out of 10, I can't use store-bought stuff anyway thanks to my sensitive skin. It really reacts poorly to all those harsh chemicals. I've heard it said that you shouldn't put anything on your skin that you would be uncomfortable eating. Because, in truth, what you put on your skin is going to be absorbed by your body. So I make nearly everything I put on my skin at home; my skin is all the better for it.

Body scrubs are no exception. I love salt scrubs because, well, they are so simple to make. Also, they always leave me wonderfully smooth. Have you ever used a store-bought exfoliating scrub that ends up just drying you out even more? This recipe won't; I promise! It is a great moisturizer, too. I've experimented a lot with different salt scrubs, throwing in a variety of ingredients from my kitchen. This is my favorite concoction yet. It rubs on great, washes of clean, and leaves you feeling smoother and moisturized. The scent is very light and just a little sweet. Just how I like it.


For this Cinnamon Honey Salt Scrub you will need:

1/2 cup coarse kosher salt or sea salt or a mixture of the two
1/4 cup almond oil
1/8 cup olive oil
2 to 3 tablespoons honey
1 tablespoon ground cinnamon

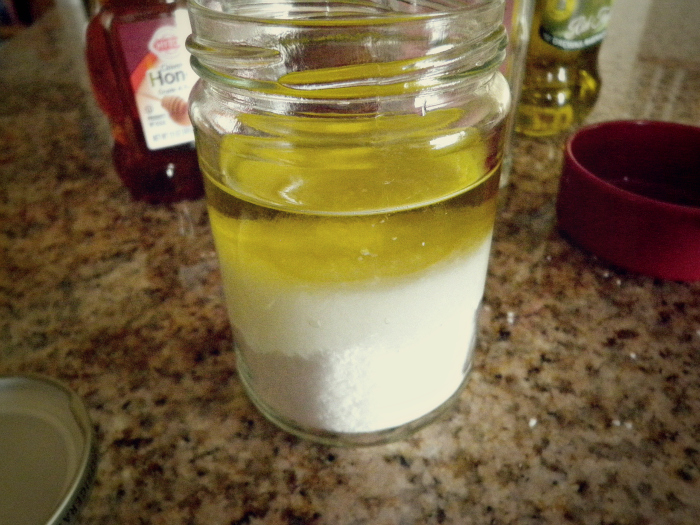
First, choose your container. I like to use old glass jars (this one once contained pesto I think), they store well in a bathroom draw and I can just pull it out when I need to. I don't keep glass jars in the shower all the time out of fear of knocking it hard enough in the tub and shattering the glass. You can use a plastic container, if that suits you better. Combine the salt and oil in your container. Oil doesn't really like mixing with anything, so really get it stirred around well. After that, measure out and add the honey and cinnamon, stirring well to combine thoroughly. If it is a little too oily, add some more salt until desired consistency is reached.


That's it! I told you it was super easy. Of course, there a tons of different combinations you can do to make a great salt scrub. You can also add some essential oils, for a more scented scrub. But this is a combination I am really loving. Mostly because of how great it is for my skin.

Olive oil is so great at moisturizing. The Romans, Greeks, and Egyptians even used it as an anti-aging remedy, thanks to it's rich supply of Vitamin E that can restore skin's elasticity. It also contains Vitamin A and other antioxidants which allow it to work as a cleanser, moisturizer, and skin protector.  Almond oil is also rich in Vitamins E, as well as Vitamin B, healthy fats, proteins, minerals, and dietary fiber. People who suffer from eczema and psoriasis can use the oil to help reduce inflammation, redness, and itching. You can even rub some almond oil under your eyes to get rid of dark circles and reduce puffiness. Honey is really wonderful for all skin types, even very sensitive skin like mine. It is an antibacterial and anti-fungal agent, which helps defeat acne. Honey is also full of antioxidants and will remove impurities and helps detoxify your skin. Not to mention it will also naturally clean skin while also moisturizing, leaving it real soft. Cinnamon is another one that is great for the treatment of acne, as well as eczema. Cinnamon can be slightly irritating when applied to skin, though, but combined with the oil I have experienced no irritation. However, I wouldn't use a salt scrub more than once or twice a week.


No matter what combination you choose, keep in mind that a little separation is natural and most likely going to happen. Just give it a quick stir before using it.


You can even make this into cute little gifts. Or just cute for yourself; I'm all about that. To use, just apply to dry or slightly damp skin. Give it a good rub and scrub, and then simply rinse off with water. Your skin may get a little pink or red, but don't let that scare you. The redness should go away quickly, as will all those impurities and dead skin cells. And all that good oil will instantly make your skin feel so wonderfully moisturized. I've been using this a lot lately, thanks to the terrible sunburn (I got on this trip) that is now peeling like a meanie. Oh boy, has it helped so much.

Do you make your own salt scrubs or beauty products? What has been your favorite creation?