Showing posts with label diy. Show all posts

Grab a Drink & Eat Up Darling | DIY


I have the easiest DIY ever to share with you today. Like, seriously, if you have a sharpie and a scrap piece of wood (that's just been lying around, sadly, begging you to use it for months) then you're already halfway done. Open up that sharpie and write some pretty words on the wood and you're really done. And you've got something cool and unique to spruce up some wall space. I've been sprucing up all sorts of corners of our apartment lately. I'm finally putting up some of the art and prints that we've had lying around — not knowing where to hang them. Something about Will being gone all this week (for work) has me a little stir crazy, or cabin feverish. But hey, I'm getting things done. I digress.

There is this awkward door in our apartment's kitchen. Literally every single person we've had over for the first time, when getting a tour of the place, opens this door and goes "Oh, what's in here?" expecting to find a full pantry. Or maybe a stacked washer and dryer. But they are all quickly disappointed when all there is to see is a giant water heater; that's all that's back there. Sorry, guys. This is apartment life. To top it off, the disappointing door is framed by an off-center air vent and a crooked phone jack. I hung the sage branch not long after moving in, to try and fill the dead space next to it, and balance it out a bit. But despite the pretty branch, this little section of our kitchen has always seemed off to me. So today I hung this Let's Stay Home print (from Maiedae) and made a little wooden sign (inspired by this) to hang as well. I think it makes quite the difference.

See how I easily made this kitchen sign below.


SUPPLIES NEEDED

+ scrap piece of wood
+ printer + computer
+ text editing software
+ printer paper
+ a sharpie

INSTRUCTIONS

+ Measure you scrap piece of wood (mine measured 12in x 5in).
+ Choose/create a phrase to use.
+ Using a text editing software, chose the font (I used Tamoro Script) and layout for your phrase of choice.
+ Be sure to keep the entire layout within the measurements of your wood piece.
+ Print out your phrase onto plain printer paper.
+ Trim down the paper to fit the wood piece and tape in place.
+ Trace directly over the phrase with a sharpie, pressing firmly.
+ The sharpie will bleed through the paper and lightly mark the wood.
+ Remove the paper and, using your print out as a reference, completely fill in the phrase with the sharpie.


Grab a drink & eat up, darling.
xx Emorie

DIY Cardboard Piñata


Last Tuesday was my mom's birthday and we planned a lovely little party for her to celebrate. Because it was a weeknight, we decided it would be fun to cook her dinner at her own home. What's better than a birthday party that comes to you!? We cooked some of her favorites; she's a huge fan of Mexican food, so the menu included fish tacos, fresh pice de gallo and guacamole, and chocolate angel food cake for dessert (my sister, Bee, is the best baker ever).

When I sent out an invitation to my mom telling her the details, she responded enthusiastically and made a joke about a piñata filled with laffy taffy. Keep in mind she had no idea the menu was Mexican food and that her party would be fiesta themed. I don't take piñata suggestions lightly, especially when it fits a party theme so perfectly! So, naturally, I made her one. And filled it with laffy taffy, obvi.


I contemplated just simply buying a piñata, but I was surprised by how expensive a classic donkey piñata from Target was. I ended up buying all my supplies as well as the candy to fill it from the dollar store for $6.00. That's half of the price of just the piñata! Plus, I'm sure you might have some of these supplies already taking up space among your craft supplies. Especially since I used cardboard to eliminate the time required for paper-mache. If you're confident in your craftiness, I highly recommend going the DIY route. I mean, it is going to get smashed anyway :) See how I created this colorful piñata below.


DIY PIÑATA:

SUPPLIES NEEDED

+ large pieces of cardboard (I used one of those big display boards, but a large cardboard box would work great)
+ streamers in different colors
+ duct tape & masking tape
+ a sharpie
+ scissors
+ craft glue
+ twine or rope (to hang)
+ assorted candy (to fill)

INSTRUCTIONS
+ Make sure you have two large pieces of cardboard of equal size. Sketch out the shape of the donkey's body with a sharpie. Once satisfied with the shape, cut it out. Use the cut out piece as a stencil and trace the shape onto the other piece of cardboard. Cut this out as well. You should now have two identical donkey shapes.
+ You will use the remaining scraps of cardboard to create a frame between your two donkey pieces, creating a 3D piñata. Cut strips the lengths of all the sides of the donkey's torso. Secure these pieces to one side of the donkey, using duct tape on the inside and masking tape on the outside.
+ Fill the piñata with candy.
+ Secure the other side of the donkey to the rest of the piñata, reinforcing all of the corners and joints with extra tape.
+ Pull out a few feet of streamers and fold it the length up onto itself as many times as you can. Fringe the streamers by cutting half way up them.
+ Cover the entire outside of the piñata with the fringed streamers. Start at the bottom of the legs and work up. Overlap the previous streamers a bit every time. Switch colors after a few rows of the same color have been glued.
+ Once everything is dry, your piñata is ready to hang!

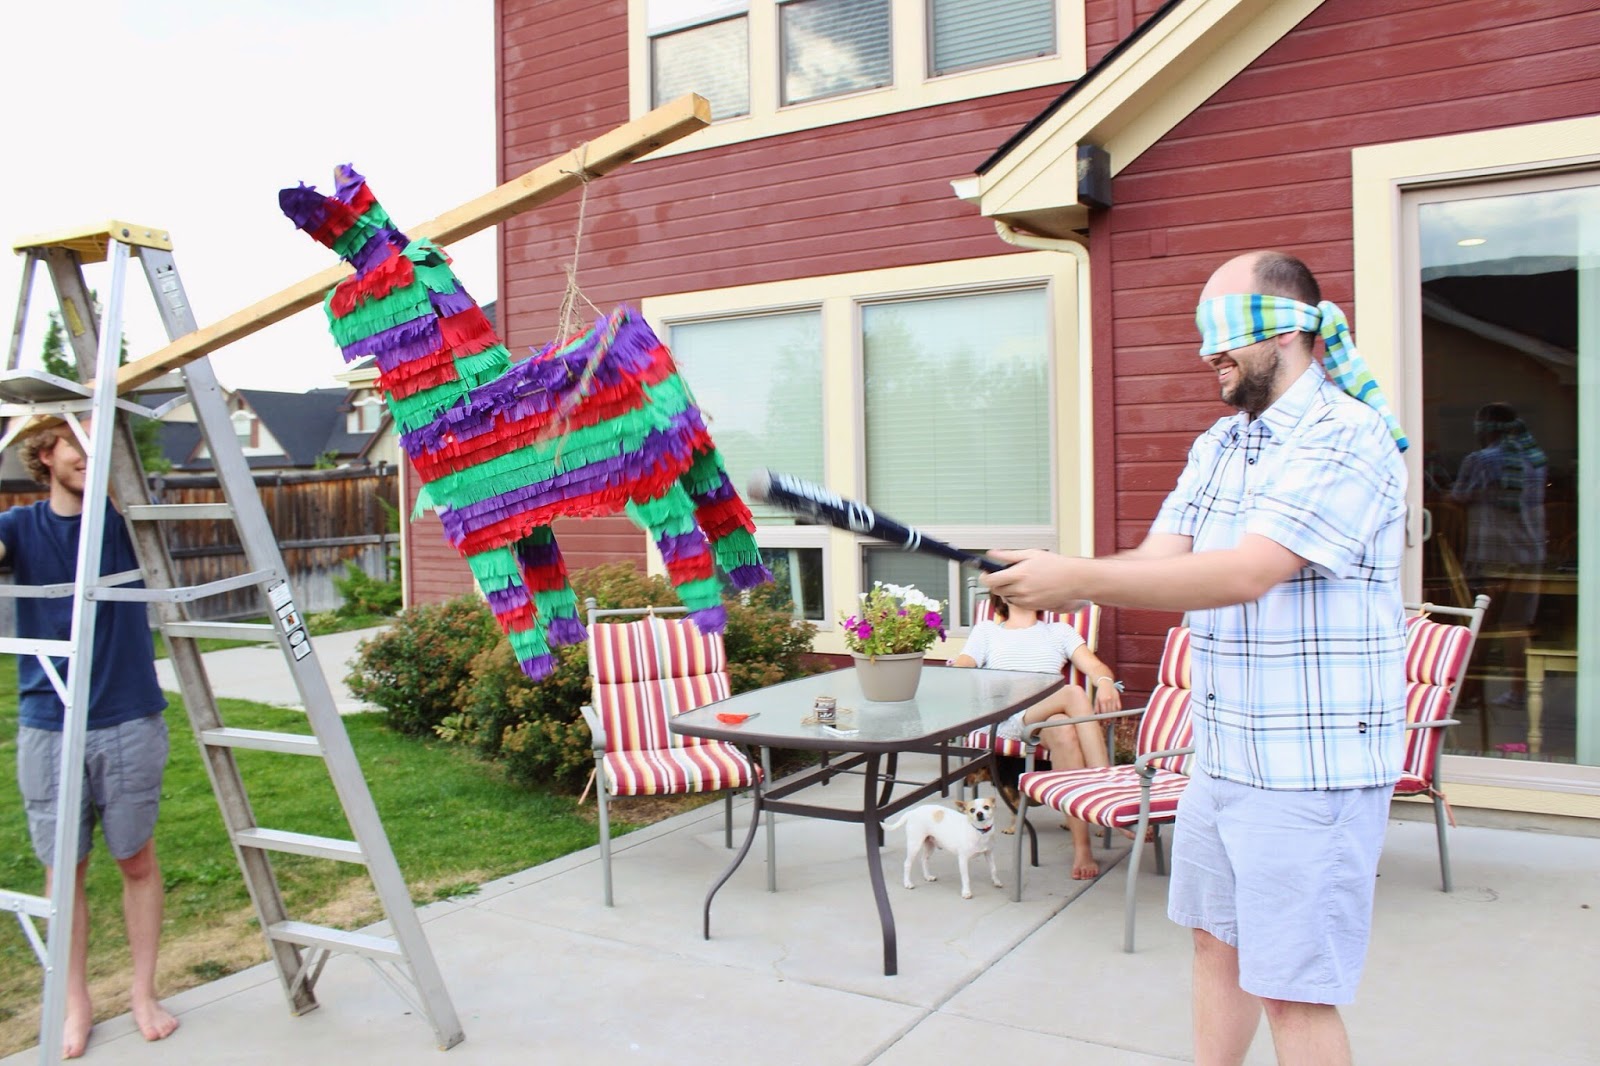
A few pictures of the piñata in action below:


Our blindfold just happened to match my mom's outfit perfectly. She had the first go at it, followed by an entertaining round by my brother-in-law, and my sister ended up breaking it open by channeling her work frustration ;) (I got a video of that one). Overall, I'd call this first piñata making endeavor a success! A special thanks to Will to holding the beam for us, as I had to use a ladder due to my mom's yard having no large trees.

Hope your Monday is treating you well!
xx Emorie

Kitty Phone Sleeve DIY


You're probably asking yourself, "What in the world is a phone sleeve?" That's fine; I'm fairly sure I just made up the term moments ago. I upgraded to a smartphone a few months back and have been so happy with the iPhone 5c I now call mine. I was so happy Apple finally made a more affordable option with their phones. I feel much more comfortable carrying a plastic device around; at the same time I don't feel shorted on style or efficiency. It is still a great device. But I like that it is a little cheaper; I feel more comfortable not having a case on it all the time. In fact, if I'm being honest, I don't ever put a case on this phone. There are times when I would like it to have a little extra padding and protection, though, like when I toss it in my purse with other items.

That's where the phone sleeve idea came from— I wanted an extra little compartment to slide my phone into before putting it in my purse, that would keep it a little more safe. I made it from some fabric scraps I had lying around. It's even got a plushy fuzzy inside, to protect the screen and give it a nice polish every time I slide the phone in and out. And I made it resemble a kitty... because I could.

See how I created this simple kitty inspired phone sleeve below.


KITTY PHONE SLEEVE DIY:

Supplies needed: fabric scraps (I used an old sweater and a very plushy fabric), embroidery thread, sewing machine, two small round buttons, one small heart shaped button, wire, velcro, fabric scissors, E6000 glue

  1. Measure your phone/device and cut a pice of fabric that is twice as long the device plus 2 1/2 inches for the front flap, and leave space for a seam on the sides. My phone is roughly 5 inches by 3 inches, so I cut a piece of fabric ~12 1/2 inches by 3 1/2 inches.
  2. Lay the side of the fabric that you want to show on the front face down on the table. Cut out a piece of plush fabric the length of your phone and as wide as the piece you already cut out (5 inches by 3 1/2 inches). Pin this piece to the long piece you laid face down. Sew the plush fabric onto the longer piece.
  3. Fold the long piece up and sew along the sides, creating a pocket. There should be 2 1/2 inches of overhang. Leave this for the flap. Trim the excess fabric and turn the pocket into itself, turning it right side out. The plush fabric should be on the inside of the pocket now. 
  4. Fold, pin, and sew the overhang you left for the flap into a pointed shape. 
  5. To create the ears, cut small rectangles (~1 inch by 2 inches) and fold into triangles. Cut off excess ends.
  6. Sew on coordinating fabric, if desired, for the insides of the ears. Glue the ears onto the back of the sleeve using E6000 glue.
  7. With embroidery thread, stitch on buttons for eyes and a heart button for a nose. For whiskers, if desired, cut three pieces of wire into equal length. Thread these wires through the back of the flap, through the embroidery thread used to stitch on the nose button. Glue in place with E6000 glue.
  8. Cover and secure the whiskers further by cutting a piece of fabric to fit on the back of the flap and over the exposed stitches and wires and glue. Finish by gluing a velcro closure onto the sleeve, to secure the flap and keep it closed. 
All done! A kitty phone sleeve to add an extra layer of protection and an extra little bit of cute.
xx Emorie


Black and Gold Mason Jar DIY


I know that the majority of the time when you see a picture of me on here I appear all pretty and made up, with a pretty outfit and makeup. But the reality of the situation is that most days I don't bother getting out of my 'comfy clothes' (I'm writing this while sporting owl pajama pants and a hand-me-down baggy sweatshirt) or putting on makeup. Which is silly, because I do really like planning outfits and getting dressed up. I like makeup, too. Both of those things make me feel pretty and pretty good about myself (I'm not saying I need pretty clothes and makeup to feel good about myself, but it doesn't ever hurt). So, I guess, I'm trying to encourage myself to get ready a little more.

Will and I bought ourselves a new corner desk for our room with the money we got for christmas and it is so so nice to have a nice place to sit and work (before we had been sitting sideways on a folding chair at a tv cart). It's also great to have an organized pretty room to feel good in. I've been sprucing up and updating other areas of the room in little ways now too. We bought a new bookcase, because it matches the desk and was only $17 on sale at Target! I've got it set up on the wall next to our closet. I finally put up a full length mirror, between the closet any bookcase, and I've decided to use the top of the bookcase to store some of my pretty things, like my earrings and makeup. I think having all of it out it in the open let's me always see my options and also encourages me to wear them more!

But the mason jar I had my makeup brushes stored in just wasn't cutting it anymore. I was improving other areas of the bedrooms in little ways, so why not my makeup storage too? I went for glam, with black and gold; it ties into other areas of the room beautifully and adds just the right amount of glitter for my liking. I chose to paint the inside of the jar, with a gloss acrylic paint, so it would still have that glassy sheen. I didn't want it to look ceramic, like mason jars often do after they've been painted on the outside. I love how it turned out! See how simple it was to create below.


Black and Gold Mason Jar DIY

Supplies Needed:
+ a mason jar
+ black gloss acrylic paint
+ a foam brush
+ wide gold ribbon
+ E 6000 glue
+ black card stock (optional)

Directions:
1. Make sure your jar is thoroughly clean and dry. Squirt a bit of paint directly into the bottom the jar.
2. Start with a small amount and use that to cover as much of the jar as it can before adding more, so you don't get unnecessary buildup.
3. Swirl the paint around in the jar and use a foam brush to evenly spread it around and up the sides in a thin layer.
4. This fourth image is what mine looked like after one coat of paint, nearly completely covered, but you'll want to be real thorough. Let the paint dry for as long as recommend on the bottle and maybe longer as the paint will drip back down to the bottom as it dries.
5. I let my jar sit for 2 1/2 hours before applying another coat of paint. I then let it sit overnight to be sure it was thoroughly dry before placing anything inside it. This fifth image is what my jar looked like after two coats of paint and drying overnight.
6. Decide where you would like the ribbon to wrap around the jar.
7. Using a toothpick thinly apply E 6000 glue to the edges of the ribbon in small sections and apply to the jar. Wrap the ribbon all the way around, pulling it flat and tight as you go.
8. Overlap the ribbon and glue it to itself. Trim any excess ribbon and create a straight seam.
9. Smooth everything out and apply a very thin layer of the glue along the seam to seal it.

Once your jar is completely dry it is ready to use and be filled with whatever you fancy! I cut out a circular piece of black cardstock to fit in the bottom of the jar and simply laid it flat in there before putting in my makeup brushes. This will make cleaning it easier and keep the bottom of the brushes from chipping the paint on the bottom of the jar.


I love how this turned out and looks perfectly custom for the shelf it is on. It goes great with my pretty jewelry stand and little box, don't you think? Do you have any clever/cute storage ideas that you use?

xx Emorie

Gingerbread Lip Scrub


My newest and favorite scrub concoction I have made, Gingerbread Lip Scrub, is a perfect Christmas treat. I think it will make a lovely gift among my DIY gift arsenal this year. I am so excited to package a bunch of this up, pair it with a jar of my Warm Vanilla Sugar Body Scrub, and give it out to some of my favorite ladies. My lips have been so unbelievably chapped, though, that I am getting plenty of use out of this lip scrub myself too. It's an added bonus that this smells (and tastes!) so good. I may have licked it off instead of rinsing. Whoops.

Let's talk a bit about all the good stuff in this mix. Sugar is a lovely gentle exfoliant. Coconut Oil has numerable benefits for the skin and will leave your lips nourished and moisturized. Molasses is a wonderful complexion brightener. Honey is full of antioxidants and is soothing, moisturizing, and clarifying. Ginger, cinnamon, and nutmeg are all stimulants that increase blood circulation and have been used in lip cosmetics for years as a natural 'plumper'. I don't include enough of these ingredients in my recipe to cause irritation (read burning sensation), but you may still notice your lips looking just slightly fuller immediately after use. For this reason, I would stick to using this particular scrub on just your lips and not elsewhere on the body. Looking for a body scrub? Try the Cinnamon Honey Salt Scrub or the Warm Vanilla Sugar Body Scrub.


Gingerbread Lip Scrub

Ingredients:
1/2 cup sugar
1/2 cup brown sugar
1/2 cup coconut oil, solid
1 tablespoon honey
1 teaspoon molasses
3/4 teaspoon ginger
1/2 teaspoon cinnamon
1/2 teaspoon nutmeg
1/4 teaspoon cloves
a few drops vanilla extract or essential oil (optional)

Directions: 
+ Combine the sugar and the brown sugar in a mixing bowl. Cream the (solid/room temperature) coconut oil in to the sugars. This looks just like butter and sugar does creamed together. A fork works best here, to evenly distribute the coconut oil and leave no large lumps.
+ Add the honey and molasses, stirring until combined.
+ Stir in the spices. Add in a bit of vanilla, if desired. Add in more spice or vanilla, if needed, in small amounts until you reach a scent you are satisfied with.

Storage and Usage: 
+ Store in small containers, glass or plastic is fine. I used an old pesto tub and a small baby food container.
+ These can be packaged up nicely for gifts; create a label for the lid of the container and tie some pretty ribbon around.
+ To use the scrub, apply to dry or damp lips rubbing gently for a bit and rinse off. Or, you know, just lick it off. You can leave it on for up to 5 minutes before rinsing.


Enjoy exfoliating and cheers to soft, smooth lips!
xx Emorie

DIY Gift Wrapping 5 Ways


In addition to making gifts every year to give out for Christmas, I really enjoy adding a handmade touch to my gift wrapping. Making your own gift wrapping is a great way to add even more of a personalized touch to your presents, as well as a way to save a little money during tho holiday season. I recieved a lot of compliments on my packaging last year, so I thought I'd share of few of my wrapping ideas from then on here. I kept these pretty simple so just about anyone can do these at home with supplies they probably already have. These are really basic ideas too, so if you like them feel free to try them out and make them your own! To start, you'll need some plain brown craft paper, or as I used here brown paper grocery bags (where did my roll of brown craft paper go?!).


1. HAND-STAMPED PAPER

Lay the gift down on the paper and cut out an area large enough to wrap the gift. Lay the paper down flat and stamp one side completely with a stamp. I used a holly berry stamp I have and a green ink pad, though any Christmasy stamp will do. You could also chose a simple geometric pattern, such as polka dots, squares, stars, or triangles. An ink pad or craft paint work well for this job. I like to make my pattern a bit random versus even and uniform. Let the stamped pattern dry and then wrap the present as usual.


2. ADD AN ORNAMENT

A really simple way to dress up a gift is to add a shiny ornament to its packaging. Plus, then in so doing, you also add in another little gift right there on the front. Because who doesn't love getting more ornaments!? Simply tie some string or ribbon around your wrapped gift and secure tho ornament on to it. Add a bit of greenery too, for more dimension, if you like.


3. TIE ON A PAPER SNOWFLAKE

If you want to go for something really unique with your gift wrapping, why not add something as unique as a snowflake to the packaging? If you enjoy making paper snowflakes as much as I do, this option is really fun too. Cut out a snowflake using any color of craft paper (who says you can't have a neon snowflake!?) and secure it to the top of the present with tape and/or ribbon. If you're looking for snowflake inspiration, here are some pretty templates.


4. ADD A BUNCH OF GREENERY

Between pine tree clippings, holly berries, poinsettia flowers, mistletoe, and pine cones etc, there are many options and combinations to choose from here. You can take fresh clippings from your own tree and seasonal plants or opt for the fake variety; no judgement it all is pretty. Create a small bunch that you like and tie it to the top of a present.


5. HANDMADE TAG 

There are so many options for a handmade tag. For the one above, I simple sketched the design by hand on some craft paper and the cut out around it and tied it on with twine. If you aren't so comfortable with your on handwriting, considering printing out some fancy topography with your printer. For an even easier option, the lovely and talented Oana Befort just added a free printable for some pretty gift tags she designed (which I'll definitely be printing myself).

Enjoy this gift-giving season!
xx Emorie